You are at the right place to read the latest education news today in
Tamil. As well as you can read the latest TRB, TNPSC, sports, job news on
our website - TN Education Info.
Menu
Palli Paarvai Application Download
Palli Paarvai Application Download | What does the Palli Paarvai app do?
Palli Paarvai is a mobile observation tool to assist the officials strengthen existing
classroom practices, based on the real-time and accurate data from classrooms. The app
captures and analyses data across four critical parameters
● Standardized classroom observations
● Teacher professional development
● Student learning levels
● Data corroboration
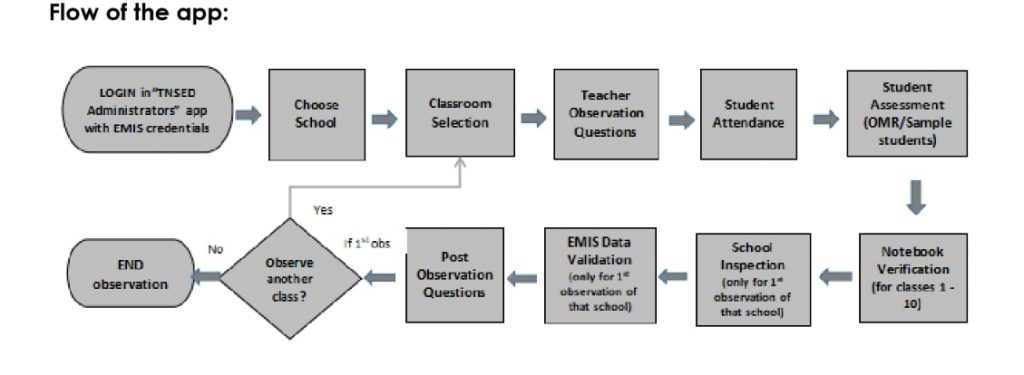
Palli Paarvai Application Download | Sections in the Palli Paarvai app:
● School Selection● Classroom Selection
● Teaching Learning Process - Observation questions
● Student Attendance
● Student Assessment
● Notebook Verification
● School Inspection
● EMIS Data Validation
● Post Observation Questions
● Observation Report
● Observe another class
● Submit Observation
Palli Paarvai Application Download | How to download the Palli Paarvai app?
● Open Google Play Store app in the mobile phone● In the search box, type “TNSED Administrators”
● Install “TNSED Administrators App”
● Login with your EMIS User name and password credentials
● Click “பள்ளி பார்வை”
 How to download the Palli Paarvai app?
 Steps for school observation:
1.Welcome Screen components
Step 1: The observer can select the school to visit either from the “Choose School” dropdown or by entering the UDISE code of the school.Step 2: Click “School Info” to get the school details and then click “Start” proceed with the observation.
The progression bar at the top displays the completed school observations against targeted school observations.
 Welcome Screen components The school selection through UDISE CODE option is applicable only for DEOs, CEOs & State Officials
 2. Classroom Selection
Step 3: The class to be observed will be given in the app. Select “Yes” or “No”according to the availability of the teacher.Step 4: Choose medium of instruction and subject the teacher is handling and
the teacher to be observedStep 5: Click on start to begin the classroom observationStep 6: If the classroom cannot be observed, select the reason for not observing. Another classroom to be visited will be shown in the app.
3. Teaching Learning process
Step 7: Observe and enter the information on various Teaching Observation questions. IMPORTANT NOTE:The observer should not interact with the teacher till the end of the period. The observer should observe the teaching and answer the questionnaire. This section has an additional TOGGLE feature- where the observer can toggle between any section in the teacher observation question section. Listed below are the teacher observation sections
A. Lesson Execution - Pedagogy questions, Teaching Learning Materials (TLMs) usage, Student Engagement, Attention to children with special needsB. Classroom Management - Student Engagement, Student Appreciation
C. Word Wall - Word wall questions will appear only for classes 1, 2 and 3.
4. Student Attendance
Step 8: Mark the attendance. The present button (“P”) is pre-selected. If a student is absent, then the absent button (“A”) is marked accordingly.5. Student Assessment
Step 9: Student Assessment is conducted to assess the students on a particular learning outcome.For classes 1, 2, 9, 10, 11, 12 - Sample 5 student assessments are conducted.
For classes 3, 4, 5, 6, 7, 8 - OMR assessment will be conducted.
5. Student Assessment
Step 9: Student Assessment is conducted to assess the students on a particularlearning outcome.For classes 1, 2, 9, 10, 11, 12 - Sample 5 student assessments are conducted.
For classes 3, 4, 5, 6, 7, 8 - OMR assessment will be conducted.If no assessment questions are retrieved from API, it throws a message “No Questions available” and by clicking OK, it moves to the next section automatically.
If Questions are retrieved from the API:5.1 Student Assessment - Sample 5 studentsStep 9.1: Student Assessment for sample 5 studentsA. Click “NEXT”
B. 5 sample students gets populated and mark whether they can be assessed or not
C. Questions for each student will appear in each screen
D. Input the answers of each student5.2 Student Assessment - OMR Assessment for all studentsStep 9.2: Print OMR Sheet
A. Print the OMR sheet (A4) and distribute to the students
B. The OMR sheet can be downloaded from the option “Download OMR Sheet” provided in the sub menu.Step 9.3: In app, select required fields to display the assessment questions
A. Based on the subject and class selected in the Classroom selection page, the assessment questions are displayed in the app.B. Ask the teacher to write those questions with options on the boardStep 9.4: Instructions for Filling the OMR Sheet Ask the Students to fill the OMR Sheet by following the given instructions
A. Use only dark HB black pencil for shading
B. Fill the students name, class, section, school and subject
C. Fill the students 10-digit EMIS ID
D. Shade the correct answer option
E. Don't fold or tear the OMR sheetStep 9.5: Instructions for Scanning the OMR SheetOnce the students have completed marking the answers in the OMR sheet, start scanning the OMR sheet by following the given instructions
A. Click on the OMR SCAN SHEETS button
B. Camera opens up
C. Take a clear picture of the OMR sheet
D. Please scan in portrait mode (vertically) and on a flat surface
E. Also, make sure all 4 borders are scanned correctly
F. Once the correct sheet is scanned, the message “Scanned EMIS ID -1013455421 matches with BALA”
G. Choose SCAN ANOTHER SHEET to scan the next student OMR Sheet (or) Choose VIEW STUDENT LIST to check the OMR scanning status of the students.
H. If the OMR sheet is not scanned correctly, the message “Image Not Clear” will appear. Retake the photo
I. If the entered EMIS ID is incorrect, the message “Scanned EMIS ID - 1011123467 does not belong to any student” will appear
J. Click NEXT to move to the STUDENT LIST to view the status of the OMR scan of the each students
K. Enter the reason for not scanning the OMR sheet of students (if any)
L. Click Next to move to Notebook Verification.Note: The i icon - displays the instructions on how to scan the OMR sheet.SHARE STUDENT ID
button is used to share the student details - name and 10-digit EMIS ID (used in OMR sheet). This is generated as a PDF file.
6. Notebook Verification
The students are randomly populated whose notebooks have to be verified.Different notebooks to be verified for different students.
NOTE: Notebook Verification is applicable only for classes 1 - 10
Step 10: If the notebooks are signed, select the last signed date of the notebook from the calendar.
7. School Inspection
School Inspections are the set of questions that the observer has to inspect the overall school performance in the academics, administration and infrastructure.
There are certain questions regarding the maintenance of the toilet facility in the school for which the observer has to take photos and upload them in the app.
This section is to be filled only one time by the observer for that school.
This section also has the toggle feature where the observer can select any section within the school inspection to fill the answers.
THIS IS SKIPPED FOR HMsIn the Infrastructure, you will be asked to take the picture of the girls toilet (with running water), if available.
8. EMIS Data Validation (might be skipped for HMs)
Step 11: Enter the Student Enrollment & Teacher position information by asking the HM for the requisite data.Click “VALIDATE” to verify the entered data with the data present in the EMIS DB.
If there is any mismatch in the data it will show in red. Discuss with HMs regarding the mismatch and ask them to make necessary corrections.
THIS MIGHT BE SKIPPED FOR HMsSHARE button is used to share & download the EMIS data validation report. The report is shared in the PDF format.
9. Post Observation Questions
These are the questions based on Learning outcome awareness, Completion of syllabus, Lesson plan availability, Remediation record availability, Time table usage, Record maintenanceStep 12: Meet the observed teacher in the HM room and fill this section by asking the teacher.
10. Observer Remarks
Step 13: The observer can leave a comment or remarks in general. It can be related to teaching, learners or school in general. The observer can type upto max of 100 words and SUBMIT.The remarks section is optional, however the entered remarks will be displayed in the observation report.1. Observation reportStep 14: An observation report is generated for that classroom observation. This observation report contains Name of the school, standard observed, observed date and learning outcome assessed, Areas of strength, Areas of improvement. This report can also be shared/downloaded in PDF format.12. Observe another class
Step 15: Do you want to observe another classroom -A. If YES, click “SAVE AND CONTINUE” to save the 1st observation and proceed to the next classroom selection page to carry out the second
observation;
B. If NO, click “SUBMIT OBSERVATION” to end the observation for that school
This step requires Internet Connectivity to sync the data to the server. After submitting the data cannot be edited or changed.
13. Completion Page
Step 16: Once the data is saved, the congrats page appears showing the data has and observation has been completed successfully.Click on “GO TO HOMEPAGE” button to redirect to the Welcome page with the school observation count updated.
Points to remember:
1. The application works only for Android mobile users
2. Ensure that your mobile is connected to the internet while completing an observation to save the inputted information in the server
3. CEOs/DEOs/State officials can either select the schools from the school dropdown or enter the UDISE code of the school
4. If the observer faces the empty screen(app crashes), kindly logout and re-login the app to start the observation from the beginning
5. If the app shows the last observation data, then please clear the cache. To clear the local data/cache,
A. Kindly logout the app,B. Long press on the app to get “App Info”
C. Click on the “Storage”D. Clear cache & data and Login again
6. OMR based assessment - OMR based assessment is applicable only for classes 3 to 8. Questions are automatically generated & need to be written on board by the teacher. Students fill their 10-digit EMIS ID & their answers in the OMR Answer sheet. The SHARE STUDENT ID button will provide a downloadable PDF file with the student name list and their respective 10-digit EMIS IDs
7. Issue in OMR Scan - If the observer faces an issue while scanning the OMR answer sheet, please enter the reason for not assessing the particular student as “Other” and proceed to the next section.
8. Issue in taking picture - If the observer faces an issue while clicking the picture of the girls toilet during the ‘School Inspection’ section, Please select the option “No” or “Not Applicable” and proceed.
9. Download OMR Answer Sheet - The observer can download the OMR Answer Sheet from the sub-menu (on the top left corner) and can share it as PDF.
10. Remarks Section - The observer can add remarks or comments about the observation. These remarks will be added in the Observation report
11. SUBMIT observation - The observer has to click on the SUBMIT OBSERVATION button to save the inputted information in the server and complete the observation.Palli Paarvai TNSED Administrators Application PDF Download Here